Tuesday, January 25, 2011

Wheat bread

Wheat bread

Sometimes, a recipe is just more trouble than it's worth. Usually, this happens when you're working with a recipe that aims for complete and utter perfection -- sure, whoever created the recipe (in this case, the folks at America's Test Kitchen) might have gotten a result that was "perfect," but who says that'll be how it comes out when you make it, and for that matter, who says that it has to be perfect, anyway? In quite a few cases, "close enough" tastes just as good to the average person.

So it was with this recipe. After hunting all over the grocery store to pick up such specialized ingredients as wheat germ and rye flour, I made this recipe, and the result was... eh. It was alright. I didn't get the oven spring I'd expected, so the loaves came out awfully flat, which I read later could actually be due to the fact that it's wheat bread, made with a harder flour -- perhaps I should've let it rise more than double the second time, but the recipe didn't say that, so what I got were loaves that were the same size out of the oven as they were going in. And for all of this fussing, the taste is pretty standard, not the yeasty deliciousness I'd expected -- again, this could be because I've only ever made white bread, so I'll admit, my expectations may have been too high. What this is, to my taste buds, is a standard wheat bread, unexceptional except for the crispy homemade-tasting crust. I suppose that at least it's all-natural, 'cause it's homemade. But I'm not sure if I'd bother making this again. Wheat might be healthier, but white just tastes better.

Wheat Bread
From "Baking Illustrated"

2 1/3 c warm water
1 1/2 tbsp instant yeast
1/4 c honey
4 tbsp melted butter
2 1/2 tsp salt
1/4 c rye flour
1/2 c toasted wheat germ
Scant 3 c wheat flour
2 3/4 c regular all-purpose flour

1. Mix the yeast with the water in a large bowl. Add the honey, then the butter, salt, rye flour and wheat germ.
2. Mix the two remaining flours in a separate bowl.
3. Add the flour mix into the wet mix, half at a time, then knead together on a lightly floured surface until the dough is soft and smooth. (Keep in mind that doughs can vary based on the temperature and humidity in your kitchen -- you may not need all of the flour, or you may need a little more. Use your own judgement as to whether it's too sticky.)
4. Form into a ball and place in a large, lightly oiled bowl. Let rise in a warm, draft-free place for about an hour, until doubled in volume.
5. Press the dough down and divide it into two equal parts. Form each into a rectangle about 1 inch thick and 9 inches long, then roll up from a long side and pinch closed. Place seam-side down into greased 9-by-5-inch loaf pans. Cover and let rise another 20-30 minutes, until doubled in volume.
6. Bake in a 375-degree oven for 35 to 45 minutes, until they sound hollow when tapped. (To be extra-sure, you can stick a meat thermometer into the center of one loaf -- if it gets up to 205 degrees, it's done.) Depan and cool on rack.

Wednesday, January 19, 2011

Carrot cake

Carrot cake, cross-section view

Sometimes, you'll do crazy things for love and family -- like bake a carrot cake, from scratch, starting at 1:30 a.m., after you've just spent a half-hour shoveling the driveway to get your car unstuck and out of the road and you're really tired and sore and just want to go to bed.

But it's my mom's 65th birthday, so I wanted to do something special for her. And she loves carrot cake. And I hadn't made one yet. It came out pretty well, too, though I left carrot shreds all over the kitchen (this would definitely be a good recipe to use a food processor, if you have one, which I don't), lots of crumbs on the table (the cake, while moist, was prone to crumbling due to the shreds of carrot and chopped pecans inside, so leveling the tops of the layers was really, really messy) and a big heap of sticky bowls in the sink when I staggered to bed around 5 a.m.

Still, it was worth it. I managed to make a cake that almost looks professional, sort of, if you squint a bit. I even managed legible writing with frosting, which I've never been able to pull off before. And Mom was really happy and thought it was too pretty to cut, and then when she cut it, she said it was delicious.

Carrot cake, top view Carrot cake, side view, uncut

Carrot Cake
From Cook's Illustrated's "The New Best Recipe"

2 1/2 c flour
1 1/4 tsp baking powder
1 tsp baking soda
1 1/4 tsp ground cinnamon
1/2 tsp ground nutmeg
1/8 tsp ground cloves
1/2 tsp table salt
1 pound carrots, peeled
1 1/2 c sugar
1/2 c brown sugar
4 eggs
1 1/2 c oil (vegetable or canola)
1 1/2 c chopped pecans (optional), plus more for the sides (also optional)
1 c raisins (optional -- I forgot to buy some, and I wasn't about to try to get back out of the snowed-in driveway to go get some, so I left them out)

16 oz cream cheese, softened
10 tbsp butter, softened,
2 tbsp sour cream
1 tsp vanilla extract
2 1/2 c confectioners' sugar

1. Whisk together the flour, baking powder, baking soda, spices and salt.
2. Shred the carrots and stir them into the flour mixture.
3. Beat together the sugars and the eggs. Beat in the oil.
4. Stir in the carrot/flour mixture, then the nuts and/or raisins, if using.
5. Pour into two greased (or cooking-sprayed) round cake pans. Bake at 350 degrees for about 30 minutes, until toothpicks inserted in the centers come out clean.
6. Cool in pans until just warm, then de-pan and cool completely on racks.
7. Beat together the cream cheese, butter, sour cream and vanilla. Beat in the confectioners' sugar. (If you think the result is too runny, you can add a bit more sugar -- I did.)
8. Level the tops of the cakes with a large serrated knife, then frost and decorate.

Friday, January 14, 2011

Biscotti

Biscotti

It's January, and that means it's very, very cold out there, sometimes the kind of cold that comes with a foot of snow and sloppy roads (ick), but sometimes the other kind, the kind where the air is dry and your nose is frozen and dammit, it's just so cold, and all you want to do is stay inside and hunker down with a big cup of tea (or cocoa, or coffee, anything hot and delicious is good).

But as much as I love tea, there's something missing when you sit there with just a mug of hot liquid, no matter how tasty that liquid is. Not to mention that eventually, you get liquid-bloat, when your stomach gets all sloshy and you're just uncomfortable. What this situation calls for is something to soak up all of that tea in your stomach, nothing huge, just a little nom, a little something to nibble while you sip.

Enter biscotti. That's what they're best at, what they're made for -- their crispy hardness and long shape make them perfect for dunking into a cup of tea.

This is another one of things that I never really thought of making before because biscotti has always been something you buy in a package or at a coffeehouse counter. But now, I'll never go back, 'cause not only are these cheaper, but they're such a forgiving recipe and so adaptable. I say "forgiving" because it calls for a cup and a half of sugar, and I was caught with only a cup in the house, so I substituted a half-cup of brown sugar, and they turned out just fine. Also, you can switch out the flavors and mix-ins to your heart's content; I used almond extract 'cause that's what I was in the mood for, but sadly, I didn't have any almonds in the house, or I would have thrown some in for extra crunch. Chocolate chips work, too, if you're in that sort of a mood. Or you could throw in citrus zest, or maybe even coconut. Whatever you feel like using should work just fine.

Biscotti
Adapted from Smitten Kitchen

3 1/4 c flour
1 tbsp baking powder
1/3 tsp salt
10 tbsp butter, melted
1 1/2 c sugar
3 eggs
1 tbsp vanilla extract
1 tsp extract, your choice (I used almond)
1 c mix-ins -- chopped nuts, chocolate chips, etc. (totally optional)

1. Whisk together the flour, baking powder and salt. Set aside.
2. Melt the butter and stir in the sugar. Add the eggs, then the extracts. Stir in the dry ingredients until combined. Stir in any mix-ins you're using.
3. Divide the dough in half. Form each half into a log about 2 1/2 inches wide and 13 inches long, then place them side by side on a cookie sheet (leave some space around them, 'cause they'll spread a bit).
4. Bake at 350 degrees about 30 minutes, until golden brown.
5. Cool about 25 minutes on the pan atop a cooling rack.
6. Slice the logs on a bias, about a half-inch thick (a serrated knife would be a good idea, but be gentle).
7. Lay the slices out flat on the cookie sheet and bake for 12 minutes, then turn them over and bake for another 8 minutes. Cool on rack.

Wednesday, January 12, 2011

Snickerdoodle blondies

Snickerdoodle blondies

Y'know, I never seem to have good luck with blondies. Perhaps it's because I haven't eaten enough of them -- I know what brownies are supposed to be like, in all of their iterations, but somehow, what might be called "fudgy" or "chewy" in a brownie strikes me as "soft" or "squishy" in a blondie. I made these, and they came out like that. And now, I've made snickerdoodle ones, for which I've been eyeing recipes for weeks now, and they came out about the same way -- "fudgy," I guess, though they're not chocolate, so, well, I don't know. What I do know is that people raved about them and gobbled them up when I put a dish of them out at work. And I know that they made the house smell awesome when they were baking. So if blondies are your thing, maybe give them a try.

Snickerdoodle Blondies
From Crepes of Wrath

2 2/3 c flour
2 tsp baking powder
1 tsp cinnamon
1/4 tsp nutmeg
1 tsp salt
2 tbsp sugar
2 tsp cinnamon
Pinch of nutmeg
1 c butter, softened
2 c brown sugar
2 eggs
1 tbsp vanilla

1. Whisk together the top five ingredients: flour, baking powder, cinnamon, nutmeg and salt. Set aside.
2. Mix together the sugar, cinnamon and nutmeg. Set aside.
3. Beat together the butter and brown sugar. Beat in the eggs, one at a time, then the vanilla. Mix in the flour mixture.
4. Spread in a greased 9-by-13 pan. Sprinkle the sugar topping evenly over the dough.
5. Bake at 350 for about 25 minutes, until the center springs back when gently pressed. Cool before cutting.

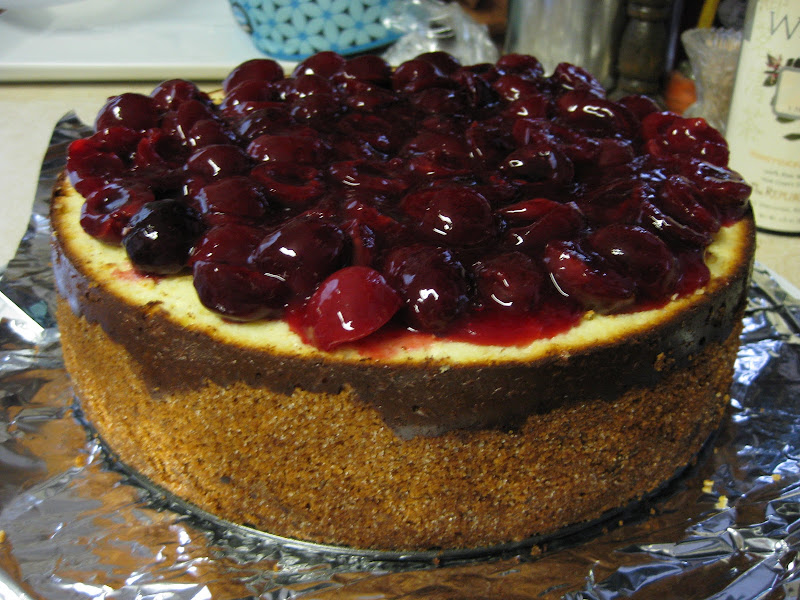
Cheesecake

Cherry cheesecake

Apologies to anyone who might be reading this, 'cause how the heck did I not post this one sooner? The holidays, I suppose. I made this for Christmas, and I guess I got caught up in the post-holiday hustle and bustle and forgot to write about it.

At least it was worth waiting for, 'cause this is one awesome cheesecake. I'd never made a cheesecake before, so I was a bit nervous that it would come out horrible, but it did not, not at all. In fact, it earned raves from my dad, and he's notoriously picky.

The only thing I have to say about this is that you'll probably burn it a bit. I did. My oven only went up to 500, and the recipe said to start it at 550, so I figured that I didn't really need to check on it until 12 minutes had passed, especially since the oven I was using is very accurate. Despite all of that, it burned a bit anyway. But I cut off some of the top parts where it was dark, covered the whole thing in homemade cherry topping and nobody cared a bit.

Cheesecake
Adapted from Smitten Kitchen

8 ounces (about 15 sheets) of graham cracker, crushed into crumbs
8 tbsp butter, melted
1/2 c sugar
1/4 tsp salt

5 8-ounce packages Philadelphia cream cheese, softened (professionals seem to recommend Philadelphia in particular, so that's what I used -- I think it's something to do with the moisture content, not sure)
1 3/4 c sugar
3 tbsp flour
1 scant tsp lemon zest
5 eggs
2 egg yolks
1/2 tsp vanilla

10 ounces cherries, pitted (frozen or fresh -- I used fresh, 'cause oddly, they were easier to find)
2 tbsp lemon juice
1/4 c sugar
1 tbsp cornstarch
1/2 c water

1. Mix together crust ingredients in a bowl and press into the bottom and sides of a springform pan, stopping just shy of the rim. (Do your best with this -- I didn't get into the corners well enough, so I ended up with a big chunk of graham at the back of each slice.)
2. Beat together the cream cheese, sugar, flour and lemon zest until well combined. Add the vanilla, then the eggs and yolks, one at a time. Scrape down the bowl and beat well, so there are no streaks of cheese left.
3. Place the springform pan on a cookie sheet (just in case your pan leaks). Pour the filling into the crust. Bake at 550 degrees (or as hot as your oven goes, if it doesn't go that hot) for 12 minutes or until puffed -- watch it carefully, so it doesn't burn! If it starts to brown on top, cut this step short and turn down the oven immediately.
4. Turn the oven down to 200 degrees and bake about an hour more, until the cake is mostly firm and the center wobbles slightly, like Jell-O, when shaken. Cool completely in the pan on a cooling rack. Chill in the refrigerator for at least 6 hours.
5. Boil all of the topping ingredients together in a saucepan until somewhat thickened and syrupy. Cool and spread on top of cake.

Friday, December 17, 2010

Gingerbread cookies

Gingerbread cookies

All my life, I've been searching for really good gingerbread cookies. And all my life, until now, I've failed, 'cause most recipes are meant to be structural more than delicious -- they're meant to be hard, sturdy, sorta tasteless but good material for building a gingerbread house. But as a food, as a delicious cookie, they totally fail.

These, on the other hand, are the cookie I plan to make from now on, 'cause they're soft and chewy and full of flavor. They're the gingerbread cookies you've always wanted to come out of your oven. Make them -- you won't regret it.

Gingerbread Cookies
From Cook's Illustrated

3 c flour
3/4 c dark brown sugar
3/4 tsp baking soda
1 tbsp cinnamon
1 tbsp ginger
1/2 tsp cloves
1/2 tsp salt
12 tbsp butter, softened and cut into pieces
3/4 c molasses
2 tbsp milk

1. Whisk together the flour, brown sugar, baking soda, cinnamon, ginger, cloves and salt. Cut in the butter until the mixture is sandy and resembles fine meal.
2. Add the molasses and milk and mix until a soft dough is formed.
3. Chill the dough at least 45 minutes.
4. Roll the dough 1/4 inch thick and cut out your shapes, spacing them 3/4 inch apart on your baking sheet.
5. Bake at 350 degrees about 9 minutes, until they are set in the centers and the dough barely retains an imprint when touched very gently with a fingertip. Do not overbake!
6. Cool on sheets for 2 minutes, then remove to cooling racks.
7. When cooled, decorate (I used Wilton cookie icing in a bottle).

Chocolate toffee cookies

Chocolate toffee cookies

I probably don't need to say anything besides "chocolate," "toffee" and "cookies," do I?

Oddly enough, these ended up being those cookies that sound great but look totally unimpressive and really don't go over that well right away. But later... later, a few hours or a day later, you pick one up and take a bite, and then you notice how awesome they are, how almost brownie-like, how rich and fudgy and delicious. And then you wonder where they all went, 'cause surely, there was a full plate here a minute ago. :)

Chocolate Toffee Cookies
From Smitten Kitchen

1/2 c flour
1 tsp baking powder
1/2 tsp salt
16 oz bittersweet chocolate, chips or chopped
1/4 c butter
1 3/4 c brown sugar
4 eggs
1 tbsp extract
5 1.4-ounce Heath bars, coarsely chopped (I used the same weight in fun-size bars -- in hindsight, the toffee-to-chocolate ratio was a bit off, so I might use more if I used the little ones next time)
1 c chopped walnuts
Sea salt for sprinkling (optional)

1. Whisk together the flour, baking powder and salt in a small bowl.
2. In another bowl, microwave the chocolate and butter, stirring and heating until smooth.
3. In a larger bowl, beat the sugar and eggs together until thick. Add in the chocolate, then the vanilla, then the flour mixture. Stir in the nuts and toffee.
4. Chill until firm, about 45 minutes. Optionally, form into logs and chill in plastic wrap, so you can slice and bake them later.
5. Drop by spoonfuls onto parchment-lined baking sheets (the parchment keeps the toffee from sticking to the pans). Sprinkle with sea salt.
6. Bake at 350 degrees for about 13 minutes, until the tops are dry and cracked. Cool on sheets (they'll continue to bake slightly as they cool).

Forgotten cookies

Forgotten cookies

I wouldn't normally turn to Emeril Lagasse for a cookie recipe. I mean, he's more known for being the bayou-cooking guy, right? Bam, lots of spices? But this recipe looked good anyway, and it was well-reviewed, and I'd never made meringues before.

Overall, I'd say that these are tasty, but there's not much cookie to them -- they're pretty much all chocolate and nuts. They're also flourless, meaning that your celiac friends should love them. :) And they're easy, so you should love them, too. In fact, they're so easy that you don't even have to watch the oven, 'cause they bake overnight, all on their own.

Forgotten Cookies
From Emeril Lagasse, via the Food Network

2 egg whites, at room temperature
1/2 tsp cream of tartar
2/3 c sugar
1 tsp vanilla
1 c chocolate chips
1 c chopped walnuts

1. Beat the egg whites until foamy. Add in the cream of tartar and beat until fluffy.
2. Add in the sugar, a bit at a time. When half of the sugar has been added, pour in the vanilla. Add the rest of the sugar slowly and keep beating until the sugar dissolves and the meringue is shiny and tight.
3. Carefully fold in the chocolate and nuts.
4. Spoon by teaspoon-fulls onto parchment-lined baking sheets (the parchment is important, 'cause they'll stick to the pan otherwise).
5. Preheat your oven to 350 degrees. When it's fully heated, put the cookies in and turn off the oven.
6. Walk away. Go to bed. When you get up the morning, they will be cookies.

Linzer cookies

Linzer cookie

It's cookie season!

Every year, I try to do at least three new kinds of Christmas cookies -- you know, the fancy ones you only make in December, not the regular kind you make the rest of the year. I try to balance out my picks between chocolate, fruit and spice kinds. And this year, I upped the ante by deciding to put the results into gift packages for a few people on my holiday card list.

I picked out my recipes, which in itself can take a week or two. I plotted out the perfect date to do all of this baking. And then... I had surgery on my finger, which severely impeded my ability to bake (as well as to blog, sadly). But fear not, 'cause there's always Mom, and she was eager to help. With her assistance, I got everything done, including these delicious Linzer sandwich cookies.

The only trouble I ran into was that I didn't have a cutter small enough for the centers -- I ended up using the mouth of an empty (cleaned) soda bottle. Well, there was one other problem, too, I guess, and that was that these were really awesome, but by the time I packed some up to ship, there were hardly any left. I'd make a double batch next time.

Linzer Cookies
From Baked Perfection

2 1/3 c flour
1 tsp baking powder
1/2 tsp cinnamon
1/2 tsp salt
1 c sugar
3/4 c butter, softened
2 eggs
1/2 tsp almond extract

1 c chocolate chips
1 c seedless raspberry jam

1. In a small bowl, whisk together the flour, baking powder, cinnamon and salt.
2. In a large bowl, beat together the sugar, butter, eggs and almond extract until creamy. Add the dry ingredients, a bit at a time.
3. Chill dough until firm, at least 45 minutes.
4. Roll out 1/8-inch thick and cut with a scalloped 2-inch cutter, cutting the centers out of half of them.
5. Bake at 350 degrees for about 8-9 minutes. Let cool.
6. Melt the chocolate chips. Spread about a teaspoon of chocolate on the flat side of each whole cookie. Let sit for a moment, then spread a bit of raspberry jam over the chocolate and top with the cookies with holes.

Tuesday, November 30, 2010

Apple tart

Apple tart

The great thing about knowing how to bake (and keeping some staples in the house at all times) is that if your honey decides to make a nice dinner, while he's out in the kitchen cutting up his ingredients, you can say, "Hey, how 'bout I make a dessert?" and in a little while, presto, dessert. That was what happened here. I started with "maybe I'll make a nice dessert," and then went to "hmm, I've got some apples in the fridge that I need to use up," and a few Internet searches later, I found this recipe.

My honey ate it with some suspicion, thinking, as I had when I first saw the recipe, "apples and cream cheese???" But he liked the taste, and so did I. I think they were going for something that would be like a traditional fruit tart, with its pastry cream filling, but knowing that pastry cream would be a bit sickening with cinnamon-sugared apples, it's swapped here for a nice cream cheese filling. You wouldn't think the combination of flavors would work, but it totally does. And the nuts on top add a nice crunch.

Apple Tart
From Joy of Baking

1 c flour
1/3 c confectioners' sugar
1/2 c butter, cut into small pieces

8 oz cream cheese, at room temperature
1/4 c sugar
1 egg
1/2 tsp vanilla

1/4 c sugar
1/2 tsp cinnamon
4 c apples, peeled and cut into slices (about 3-4 apples)

1/3 c sliced almonds

1. Mix together the flour, confectioners' sugar and butter with a pastry blender or food processor. Press it into a tart pan with a removable bottom, then put it in the fridge.
2. Cut up the apples and toss them with the cinnamon and sugar. Set aside.
3. Beat together the cream cheese, sugar, egg and vanilla in a good-sized bowl. Spread this over your crust.
4. Top with the apples. Sprinkle almonds on top.
5. Place pan on a cookie sheet, then bake at 450 degrees for 10 minutes. Drop the temperature of the oven to 400 degrees and continue to bake for another 25-30 minutes, until the apples and golden and soft and the filling is set. Cool on a rack before cutting.