Tuesday, July 27, 2010

Blueberry buckle

Blueberry buckle

It's always nice when your hobby becomes someone else's treat, a situation where someone is actually asking you to do something you love to do. So it is now with my baking -- first with my coworkers, who seem to get excited every time I walk through the door with a plate or my trusty Cupcake Courier (I don't get a commission on these -- I just love mine so much!).

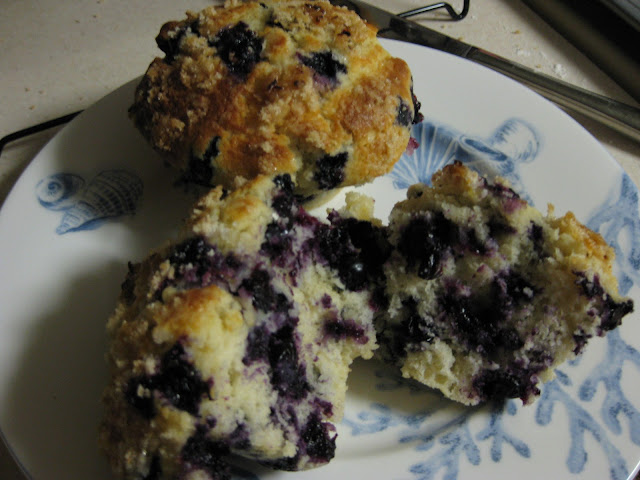
Now, my boyfriend's gone from willing guinea pig ("here, hon, eat this, tell me what you think") to eager customer, so to speak, asking me the other day if I'd make him something else this week that he could munch on in the mornings, since he'd eaten the blueberry muffins all last week and enjoyed them. Ask and ye shall receive -- I'd been eying this recipe for blueberry buckle ever since he bought the farmers' cookbook when we went berry-picking.

Here's one thing I learned, though -- don't trust a farmer to proofread. The recipe they've printed calls for 1/4 cup of salt. A quarter-cup of salt??? Good thing I'm not a blind recipe-follower -- at this point, I have enough knowledge and instinct to know that that had to be a typo. A quick Google search turned up plenty of blueberry buckle recipes, all of them with 1/2 teaspoon of salt, so that's what I went with. The result was delicious, though a little over-iced (you know how it is -- "oh, too thick, needs more milk..." "wait, too thin, add more sugar..."). It's also a tad Bisquick-y ... I imagine there's probably a shortcut version of this recipe out there that uses Bisquick instead. But me, I work from scratch as much as possible. :)

Thawing, rinsing and drying blueberries Batter up
Ready for the oven Readying the glaze

Blueberry Buckle
Adapted from the Winney's Farm cookbook, volume 3
2 c flour
3/4 c sugar
2 1/2 tsp baking powder
1/2 tsp salt
1/4 butter, softened or melted and cooled
Scant 3/4 c milk
1 egg
2 c blueberries, thawed if frozen, coated with flour

1/2 sugar
1/3 c flour
1/2 tsp cinnamon
1/4 c butter, softened

1/2 c confectioners' sugar
1/2 tsp vanilla
Milk as needed

1. Preheat oven to 375 degrees. Grease 9-inch round or 8-inch square baking pan.
2. With a hand mixer, beat together the butter, sugar, egg, milk, flour, baking powder and salt.
3. Gently fold in the blueberries. Spread in pan.
4. Crumble together sugar, flour, cinnamon and butter. Sprinkle over top of batter.
5. Bake for 40-50 minutes, until a toothpick comes out clean.
6. Whisk together the confectioners' sugar, vanilla and milk to make a glaze, then drizzle over cake. Serve warm if possible.

Blueberry pancakes

Pancakes

Our freezer is still packed full of blueberries from our recent picking expedition, so I decided that rather than going out to brunch on Sunday, a homemade breakfast was in order. How better to use up blueberries (aside from muffins, of course) than blueberry pancakes?

Of course, this was right around the time I remembered that blueberries, like the Cookie Monster's cookies these days, are a sometimes food for me -- I really do get tired of them awfully quickly, so I found myself picking around them after a pancake and a half or so. No matter, though. The pancakes were still quite good, so good, in fact, that my boyfriend, not much of a pancake eater, said he'd eat them again whenever I want to make them. :)

Lining up the ingredients

Blueberry Pancakes
Adapted from The Joy of Cooking
1 1/2 c flour
3 tbsp sugar
1 1/2 tsp baking powder
1/2 tsp baking soda
1/2 tsp salt
1 1/2 c buttermilk
3 tbsp unsalted butter, melted
2 eggs
1-2 c blueberries, fresh or thawed if frozen

1. Whisk together the flour, sugar, baking powder, baking soda and salt in a large bowl.
2. In another bowl, whisk together the buttermilk, butter and eggs. Pour the wet ingredients into the dry ingredients and whisk together briefly until just combined.
3. Heat up and grease your griddle or a large skillet. Pour 1/3 cup or so of batter at a time onto the griddle, then scatter blueberries over the top. When the edges go a bit dry and the bubbles in the batter start to break, flip them over and cook until both sides are lightly browned.

Monday, July 19, 2010

Blueberry muffins

Fresh out of the oven

I went blueberry-picking for the first time yesterday, intent on getting some more farm-fresh fruit for my baking endeavors ('cause farm-fresh really makes a lot of difference as far as flavor is concerned). It was mission accomplished, and then some -- we walked away with a total of more than 3 quarts of berries, plenty for me to put up in the freezer to go in cobbler or pie or, well, who knows? Maybe even cupcakes.

But I left one pint out in the fridge, 'cause I knew I had to start with the one dish everyone thinks of when they think of blueberries and baking: Blueberry muffins.

I had intended to use the recipe in Bakewise, 'cause I own a copy and haven't made a single thing out of it yet. But sadly, the book will have to keep waiting, 'cause I had the idea to look up the "Cook's Illustrated" recipe, and their recipes are almost always good, plus, theirs looked way less complicated than the one in Bakewise (I love Shirley Corriher, but damn, her recipes are fussy). I found the "Cook's Illustrated" recipe online, but it, too, seemed a bit fussy -- make jam, just to make muffins? Then, I poked around online a bit and figured it out: They were only doing this because their recipe was created for store-bought berries, which tend to have a lot less flavor. Surely, I wouldn't need to go to such trouble with berries fresh off the bush.

Still, it did call for a lot of bowls, at least five different bowls of prepped ingredients. But ah, well, that's what dishwashers are for, right? And the results were delicious -- they were a touch berry-heavy for me (I probably could've used fewer, since the ones I used were so flavorful), but the lemon-sugar topping provides contrast and keeps the berry flavor from being overwhelming.

Lemon sugar and floured blueberries Ready to go in the oven
Time to eat

Blueberry Muffins
Adapted from a "Cook's Illustrated" recipe reprinted at The Bitten Word
1/3 c sugar
Zest of 1 lemon
2 c blueberries (1 pint)
1 1/8 c sugar
2 1/2 c flour
2 1/2 tsp baking powder
1 tsp salt
2 eggs
4 tbsp unsalted butter, melted and cooled slightly
1/4 c vegetable oil
1 c buttermilk
1 1/2 tsp vanilla extract

1. Preheat oven to 425 degrees. Spray a 12-muffin pan with nonstick spray.
2. Zest the lemon and mix the zest with 1/3 c sugar. Set aside.
3. Place the butter in a small bowl, microwave until melted and set aside.
4. Rinse and dry your blueberries, then place them in a bowl with a little bit of flour and toss gently to coat. Set aside. (This will keep the berries from sinking to the bottom of your muffins when they're baked.)
5. In another bowl, whisk together the flour, baking powder and salt. Set aside.
6. In a large bowl, whisk together the eggs and 1 1/8 c sugar. (FYI, 1/8 c is 2 tbsp.) Add the melted butter and the oil and whisk to combine. Whisk in the vanilla, then the buttermilk.
7. Stir the flour mixture into the liquids until just moistened -- batter will be a bit lumpy, and this is fine, don't overmix.
8. Fold in the blueberries.
9. Spoon or scoop the batter into the muffin cups; batter should completely fill the cups and mound slightly. Sprinkle the lemon sugar evenly over the tops.
10. Bake 17-19 minutes, until golden and just firm. (I used the toothpick test on mine, even though the recipe didn't say to, and they were done at around 17 minutes.)
11. Let cool in pan 5 minutes, then cool on rack for at least 5 minutes before eating. (Note: When I de-panned mine, they were so moist and berry-filled that they wouldn't stand on the rack without collapsing into the rack wires. I'd advise cooling them upside-down, 'cause the tops are firmer and can take the weight better.)

Friday, July 16, 2010

Good-karma brownies

Mmm, brownies

It's been an exceptionally lousy week, one of those times when I truly need to get to the weekend, and fast, but it's only the beginning of the work week, and I just need to stay home and be hugged and eat ice cream. But I can't do anything about that, really, just soldier on until the weekend. Something I can do, though, is try to make something good out of a crappy week, pay some good karma forward. So when I saw that some people I know online had just been scammed out of hundreds of dollars, I asked for their addresses and resolved to send them something to cheer them up a bit.

But what would I send? Well, why not baked goodies? Everyone likes goodies. And why not brownies? Almost everyone likes brownies.

I've been a bit unsatisfied with my usual brownie recipe, though. I like it fine, but a lot of other people find it a bit ho-hum, maybe 'cause it's not the kind of brownie they're used to. So I went looking for something that's more of a crowd-pleaser, more like ones from a boxed mix, perhaps, 'cause everyone likes that kind, except mine would be homemade and way better.

Before I go any further, let me just say that I think the usual categories of brownies are useless. "Cakey" brownies aren't light like cake, "fudgy" brownies aren't hard enough to be fudge-like, and "chewy" brownies, well, usually the only chewy part is on the very edges.

So I'm not going to bother with those categories. What I will say is that these create a softer brownie, the kind where when you bite into it, it just sorta melts into super-chocolatey awesomeness, whereas my old recipe was more of a dense brownie, something you could bite into and chew on. Also, these earned an immediate reaction of "you have got to make more of these, lots of these, only these from now on" from those who were iffy on my old recipe (which I'll probably still pull out sometimes, 'cause darnit, I liked them). Perfect, I'd say, for ensuring good karma once you give these away (if you can part with them, that is).

Good-Karma Brownies
Recipe from Smitten Kitchen
10 tbsp unsalted butter
1 1/4 c sugar
3/4 c plus 2 tbsp cocoa
1/4 tsp salt
1/2 tsp vanilla extract
2 eggs
1/2 c flour
2/3 c mix-ins, optional (chocolate chips or walnuts would be good)

1. Line an 8-by-8-inch pan with foil or parchment paper (otherwise, it'll be a total pain getting these out of the pan). Preheat oven to 325 degrees.
2. Melt the butter in a good-sized bowl in the microwave.
3. Stir in the sugar, cocoa powder and salt. Add the vanilla. Mix in the eggs, one at a time. Then, stir in the flour until combined.
4. Fold in your mix-ins, if using (I used chocolate chips, 'cause that's what I had in the house).
5. Bake for 25-30 minutes, or until a toothpick inserted in the center comes out slightly moist. (It took more like 35 minutes for me.) Let cool on a rack.

Monday, July 12, 2010

Chewy amaretti sandwiches

Chewy amaretti sandwiches

Sometimes, you come across a recipe that looks so easy that you have to try it. And sometimes, you quickly start to regret that decision.

Let the chaos begin...

These almond cookies looked so simple -- only four ingredients! But then I started to make them. And then, I started swearing under my breath. The almond paste, well, it really didn't want to get along with the sugar and salt -- it would rather jump out of the bowl and onto the table (or even take the long plunge down to the floor) than combine properly. Eventually, I managed to beat it into submission, and I ended up with a rather meager-looking amount of dough.

Then, I looked at the recipe and saw a word I hated -- "pipe." I'm not very practiced at piping, so when I see "pipe," I read "this is going to be a pain and you're going to end up with a hand cramp and a sticky mess." I thought, well, I'll just spoon it, then, but the recipe calls for 3/4-inch cookies. Get out a tape measure or ruler, right now, and look at how tiny that is. Go ahead, I'll wait. *taps her foot and waits* See? Holy crap, that's tiny! And it's gonna be a pain to spoon out that small, so I guess I have to pipe it after all. (I did at least go with the plastic-baggie method, so I didn't have to wash a piping bag... and of course, the bag popped open on me and shot batter all over my hand, despite my best efforts.)

Little blobs of sticky annoyance One spent zip-top bag that I was officially fed up with

By the end of this, I was already thinking "I'm never making these again, I'm never making these again." But then, they came out of the oven, and they actually looked good, like proper cookies and everything.

Hey, they're cookies!

And they're delicious, absurdly sweet and chewy and a little airy, with bright fruitiness from the jam I put inside them, a perfect foil for the sweetness. Alright, maybe I'll make these again, if somebody asks for them.

Chewy Amaretti Sandwiches
From Smitten Kitchen
3/4 c almond paste (not marzipan -- one small can or tube should do)
1 c sugar
Pinch of salt
2 egg whites, left at room temperature for at least 30 minutes

1. Separate the egg whites out and set aside. Preheat the oven to 300 degrees and move the racks so there's one in the top position and one in the bottom position. Line two cookie sheets with parchment paper. (I usually skip the parchment, but don't skip it here -- you'll never get them off the pan otherwise.)
2. Beat together the almond paste, sugar and salt until combined. (Use a food processor if you have one. I don't, so I used a hand mixer.)
3. Add in the egg whites and beat until smooth.
4. Spoon the mixture into a piping bag with a 3/8-inch tip or a zip-top bag (zip the bag shut, then snip off one of the bottom corners). Pipe cookies 3/4 inch wide and about 1/3 inch tall, about 1 inch apart (they will spread). Tap down any points sticking up with a finger dipped in water.
5. Bake for about 7-8 minutes. Rotate the pans in the oven and bake for another 8-9 minutes, until puffed and golden.
6. Let cool on parchment before attempting to remove them. Serve plain or as sandwiches with raspberry jam or chocolate ganache in the middle.

Double-chocolate cookies

Double-chocolate cookies

I was headed over to a friend's house, and I thought I'd bring some sort of treat. Something I have to be able to transport easily ... something everyone will like, including the kids ... hey, everybody likes chocolate, or most everybody, and everyone likes cookies, kids and adults alike. It was then that I remembered this recipe.

Cookie dough you can eat right out of the bowl without fear

I tried this one a few months back as originally written, as a chocolate-with-steel-cut-oats cookie, and I remembered it being somewhat chewy, a little sandy and a bit hard, what with the little oat bits and all. But these came out more crispy without the oats, more like a chocolate wafer cookie, almost (mmm, I bet these would make awesome ice cream sandwiches). Cut back on the baking time to keep them a bit more chewy -- since there aren't any eggs involved, there's no reason not to underbake for texture's sake.

Flattened on the pan and ready for the oven

Double-Chocolate Cookies
Adapted from Epicurious
3/4 c flour
1/4 c cocoa powder
1/2 tsp baking soda
1/4 tsp salt
1/2 c (1 stick) unsalted butter, room temperature
1/2 c sugar
1/2 tsp vanilla extract
1/4 cup semisweet chocolate chips

1. Preheat the oven to 350 degrees.
2. Whisk together the flour, cocoa, baking soda and salt in a bowl and set aside.
3. In a larger bowl, beat the butter with an electric mixer until fluffy. Add the sugar and vanilla and beat thoroughly. Add in the dry ingredients and beat until mixed -- it'll look like lots of chocolatey fluffy bits that pack together into a dough when you stir it.
4. Stir in the chocolate chips.
5. Pick up a generous tablespoon or so at a time and roll it between your hands to create a ball. Place each ball on your cookie sheet and flatten it with your hand so it's about 2 inches wide. Place the cookies about 2 inches apart (they will spread quite a bit).
6. Bake around 7-8 minutes, until the tops are a bit cracked, for chewier cookies; bake 13-14 minutes for more crispy ones.

Thursday, July 8, 2010

Lemon meltaways

Lemon meltaways

I've now reached the point where baking threatens to become more of a compulsion than a hobby. When did this point come, you might ask? In the fourth day of a 90-plus-degree heat wave, when the thermometer read 97 but all I could think of was baking cookies.

But to my credit, these weren't just any cookies. Oh no. Not in this weather. With the weather this unbelievably horrid, what I wanted more than anything was Lemon Coolers.

Remember Lemon Coolers? Came in a green box, made by Sunshine Biscuits, extra-delicious when you stashed the whole box in the freezer and then pulled out a few at a time to scarf down ice-cold? Yeah, that's the stuff. Lemony, chilly, melt-in-your-mouth crumbly-buttery Lemon Coolers.

Unfortunately, they quit making Lemon Coolers years ago. Apparently, I'd have to come up with a home-baked alternative.

Not a problem, though -- there are tons of knockoff recipes floating around on the Internet. Many of them included stuff I didn't have lying around my house, though, including one recipe that even uses lemon Kool-Aid mix. A pouch full of artificial flavors and colors and chemicals, in my cookies? Oh no, this won't do. Luckily, I found a solution where I wasn't exactly looking for it -- a recipe for key lime cookies that looked ripe for tweaking.

All lined up for the oven

They're not exactly Lemon Coolers, but y'know, they're still pretty darned tasty, especially chilled, and they're not terribly hard to make, either, though the sugar-coating gets a little tedious. And they're an easier version of a shortbread-style cookie than I've tried before -- in fact, I may try making these again but swapping out the lemon juice for water and a pinch of sugar, just to see if I can turn these into slice-and-bake plain shortbread cookies.

Lemon Meltaways
Adapted from Smitten Kitchen
12 tbsp unsalted butter, room temperature
1 c confectioners’ sugar
2 tbsp lemon juice (or any citrus juice of your choice)
1 tbsp vanilla extract (I swapped a little of this for lemon extract, just to punch up the flavor)
1 3/4 c plus 2 tbsp flour
2 tbsp cornstarch
1/4 tsp salt

1. Cream butter and 1/3 c confectioners' sugar with an electric mixer until fluffy. Add in the lemon juice and vanilla and beat until fluffy.
2. In another bowl, whisk together the flour, cornstarch, and salt. Pour these into the butter mixture and beat to combine.
3. Form the dough into a log around 1 1/4 inches in diameter. (I did this by putting it on waxed paper, folding the paper over it and then pushing one edge toward the dough to force it into a log shape.) Wrap in plastic wrap and chill for at least an hour.
4. Preheat oven to 350 degrees. Pull out your dough and cut into 1/4-inch-thick slices, placing them on a cookie sheet with a little bit of space in between them. Bake until just barely golden, about 15 minutes -- keep an eye on them, 'cause they may very well take less time to be done.
5. Dredge the warm cookies in the remaining confectioners' sugar. (I sometimes use a big zip-top bag for this, just putting the cookies in with the sugar and shaking it up. But these were delicate enough that they actually tended to break that way, so I ended up putting the sugar on a plate and dredging them.)
6. Let cool (this won't take long), then coat a second time in confectioners' sugar.

Monday, July 5, 2010

Chocolate pudding

Puddin', aw yeah

When you make certain recipes, you know you're going to end up with a bunch of half-eggs, whether it be a pile of whites or, in this case, a pile of yolks left over from making angel food cake. Whites are easy enough to use up, but what about yolks? The most common way to use yolks is in a custard, like a pastry cream or a pudding.

Mmm, pudding. Who doesn't like pudding? Especially chocolate pudding. But the problem is that so many people eat bad pudding and accept it as alright. Pudding out of a Jell-O box? Well, that's tolerable, though the cooked kind always ends up with lumps and a horrible skin, no matter what you do. But pudding in those pre-packaged pudding cups? Seriously? That stuff tastes more like chemicals than pudding. And that's just not right, not when pudding should be a creamy, luxurious, delicious experience.

So, pudding. Real pudding, and y'know, it wasn't even that hard.

Chocolate Pudding
Recipe from the Joy of Baking website.
3/4 c sugar
3 tbsp cornstarch
1/3 c cocoa powder
1/8 tsp salt
2 1/2 c milk (I used 1% 'cause it's what I had -- I bet whole would be even better)
1/2 c heavy cream
4 egg yolks
4 ounces (2/3 c) semisweet chocolate, finely chopped (I used chocolate chips)
1 1/2 tsp vanilla extract
1 tbsp unsalted butter, room temperature, cut into pieces

1. In a heatproof (glass or stainless steel) bowl, whisk together the sugar, cornstarch, cocoa and salt. Whisk in 1/2 c of the milk. Mix in the egg yolks, one at a time.
2. Rinse out a medium saucepan with water. Pour in the other 2 c of milk and the cream. Bring this just to a boil, then pull the pan off of the heat.
3. Slowly pour a bit at a time of the hot milk mixture into the chocolate mixture. Don't rush this -- pour a little, stir, pour a little more, stir again. If you rush, you'll end up with scrambled eggs.
4. Once all of the milk is mixed into the chocolate, pour the contents of the bowl back into the saucepan and place over medium-low heat. Stir or whisk until it thickens up to the consistency of mayonnaise. Don't walk away or stop stirring -- cornstarch works quickly, so it'll be watery and you'll be thinking "geez, how long's this gonna take?" and then all of a sudden, it'll go from water to thickened in a matter of seconds.
5. Remove from the heat and stir in the chopped chocolate (or chocolate chips), vanilla and butter until everything is melted and smooth.
6. Pour into a bowl or individual serving dishes and cover with plastic wrap, pressing the plastic directly onto the top of the pudding to prevent a skin from forming. Refrigerate until chilled.

Strawberry shortcake

Mmmm, shortcake...

We begin this blog with a bang, a recipe made 100 percent from scratch and for a holiday, too, bright red berries for the Fourth of July. I went the whole nine yards, and 12 eggs, for this one. You can't make an omelet without breaking eggs, and you can't make an angel food cake without having 12 yolks left over.

12 yolks left behind

Now, before someone jumps on this, yes, I know, technically, strawberry shortcake is made with shortcake biscuits. But I've already made biscuits, and I hadn't made angel food cake yet, and angel food's good with berries and cream, too, right?

So, onward. Onward through the typical sift-and-set-aside phase and on to merengue, aka "beat the crap out of it with the mixer, then keep beating it some more." But eventually, just keep going, and just when you arm starts to cramp a bit from holding the mixer, voila, stiff peaks.

My peaks are stiff

Fold fold fold fold, do not stir, the dry stuff in, and into my new tube pan it went.

Yes, I was a bit messy getting it into the pan

And almost an hour later, huzzah, cake!

Angel food cake

I had farm-fresh strawberries in the freezer, and I had cream in the fridge, so the rest of this wasn't hard at all. And it was delicious. Oh, was it delicious. I even got the comment, "is this store-bought, or did you make this?" Considering the source, that was pretty high praise. And it disappeared mighty fast, too. :)

Angel Food Cake
This recipe is a composite of a bunch of recipes I found online, mix-and-matched according to my whims, so I can't quote a direct source.
1 c flour
1 1/2 c sugar
12 egg whites
1/4 tsp salt
2 tsp vanilla extract
1 tsp cream of tartar
1 1/2 tsp lemon juice

1. Heat oven to 325 degrees.
2. Sift together flour and 3/4 c of sugar (or just whisk them together in a bowl, if you don't feel like using the sifter).
3. In a separate bowl, beat the egg whites until they're a bit frothy, then add the cream of tartar and salt. Beat on high speed for a while longer, until it starts to come together into a soft, fluffy mass, then add the other 3/4 c of sugar, vanilla and lemon juice. Continue to beat on high until when you turn off the mixer and pull the beaters out, you get stiff peaks.
4. Sift (sorry, this time you have to) the dry ingredients over the top of the egg white mixture and gently fold together (don't mix!) until incorporated.
5. Spread batter in a tube pan (do NOT grease the pan), then pick up the pan and drop it straight down onto the counter a few times to knock some of the bigger air bubbles out of the batter.
6. Bake for 50-60 minutes, until the cake is golden and springs back when you poke it in the center.
7. Tip the pan upside-down onto a rack and let cool. When cooled, run a butter knife around the edges and de-pan.

Strawberries
1. Place a reasonable amount of strawberries for the amount of people you're feeding into a good-sized bowl. (I think I used about a bit more than a quart of berries, but I didn't measure it.) If you have a lot of big berries, you may want to slice them up -- or you could just use a potato masher on them before serving, that's alright, too.
2. Sprinkle a few tablespoons of sugar over the top of the berries and stir.
3. Put the bowl in the fridge and leave it for at least a few hours, so the sugar seeps in and the berries release some of their juices. Overnight would be even better.

Whipped cream
1 c heavy (whipping) cream
1 tsp vanilla extract
1 tbsp confectioners' sugar

Beat together on high until it becomes whipped cream. :)

Thursday, July 1, 2010

It all started with a New Year's resolution

As 2009 ended, my boyfriend, who's always been very good at making and keeping New Year's resolutions, encouraged me to make one, too. I have a history of being terrible at keeping resolutions any longer than a week, but with his support, I decided to go for it.

I've always wanted to be someone who could whip up any baked good from scratch, be it bread or cake or what have you, and he'd just bought me a new baking book for Xmas, so I decided to bake something I hadn't made before at least every other week for the entire year. I also decided that "bake" would be a term I used sort of loosely; if it was a dough, it counted (like pasta or dumplings), and if it was something a pastry chef would make, baked in the oven or not, it also counts.

Well, six months have passed, and I'm already well ahead of that goal -- I guess you could say I've already succeeded, having made 29 different things from January to the end of June, when I only had to make 26 for the year. So what's the next challenge, as I carry on with my now near-addiction to making treats both sweet and savory (but mostly sweet)? A blog. This blog. Why not? So follow along, won't you, and we'll see what I can learn to make next. :)