Tuesday, November 30, 2010

Apple tart

Apple tart

The great thing about knowing how to bake (and keeping some staples in the house at all times) is that if your honey decides to make a nice dinner, while he's out in the kitchen cutting up his ingredients, you can say, "Hey, how 'bout I make a dessert?" and in a little while, presto, dessert. That was what happened here. I started with "maybe I'll make a nice dessert," and then went to "hmm, I've got some apples in the fridge that I need to use up," and a few Internet searches later, I found this recipe.

My honey ate it with some suspicion, thinking, as I had when I first saw the recipe, "apples and cream cheese???" But he liked the taste, and so did I. I think they were going for something that would be like a traditional fruit tart, with its pastry cream filling, but knowing that pastry cream would be a bit sickening with cinnamon-sugared apples, it's swapped here for a nice cream cheese filling. You wouldn't think the combination of flavors would work, but it totally does. And the nuts on top add a nice crunch.

Apple Tart
From Joy of Baking

1 c flour
1/3 c confectioners' sugar
1/2 c butter, cut into small pieces

8 oz cream cheese, at room temperature
1/4 c sugar
1 egg
1/2 tsp vanilla

1/4 c sugar
1/2 tsp cinnamon
4 c apples, peeled and cut into slices (about 3-4 apples)

1/3 c sliced almonds

1. Mix together the flour, confectioners' sugar and butter with a pastry blender or food processor. Press it into a tart pan with a removable bottom, then put it in the fridge.
2. Cut up the apples and toss them with the cinnamon and sugar. Set aside.
3. Beat together the cream cheese, sugar, egg and vanilla in a good-sized bowl. Spread this over your crust.
4. Top with the apples. Sprinkle almonds on top.
5. Place pan on a cookie sheet, then bake at 450 degrees for 10 minutes. Drop the temperature of the oven to 400 degrees and continue to bake for another 25-30 minutes, until the apples and golden and soft and the filling is set. Cool on a rack before cutting.

Pumpkin pie

Pumpkin pie

Thanksgiving is all about tradition. So when I asked if I could make the pies this year (knowing that the threatened alternative was boughten pies -- the horror!), I knew I'd better deliver something good or else I'd never hear the end of it.

I heard plenty of it anyway, though. And by "it," I mean "that's now how we do it!" As in "no, you DON'T pre-bake the crust, I NEVER do!" And "you don't have to bake the crust, the can doesn't say to!" And especially that one -- "That's not how the can says to do it!!!" Ah, the all-hallowed can. Mom was referring, of course, to the recipe on the back of the Libby's pumpkin puree can, the recipe she's used every year, and apparently, if I wasn't following that recipe, I was doing it wrong and I was going to ruin Thanksgiving.

I'm happy to say that my pies were just fine, thankyouverymuch. Nobody complained about them at all. Though I think that next time I make them, I'd probably try using light brown sugar, 'cause the dark brown gave the pies a darker color than I'm used to and a bit of molasses flavor that, well, it wasn't bad, not at all, but I'm not used to that, either. Tradition, dontchaknow.

But am I making them next year? Doubtful. I'll leave Mom to her crust-in-a-box (*shudder*) and her sacred back-of-the-can recipe and take on some other part of the meal instead.

Pumpkin Pie
From Cook's Illustrated

One pie crust (I used half of this crust recipe)
2 c pumpkin puree
1 c brown sugar (the recipe calls for dark -- I might use light next time)
2 tsp ginger
2 tsp cinnamon
1/2 tsp nutmeg
1/4 tsp cloves
1/2 tsp salt
2/3 c heavy cream
2/3 c milk
4 eggs

1. Prebake your pie shell at 375 degrees, lined with foil and weighted down, for about 25 minutes on the lower rack of your oven. Remove foil and weights and bake 5 or so minutes more, until light golden.
2. Meanwhile, as the crust is baking, mix the pumpkin, sugar, spices and salt in a large saucepan and bring to a sputtering simmer. Cook about 5 minutes.
3. When the crust comes out of the oven, move the oven rack to its lowest position and turn up the oven to 400 degrees.
4. Whisk the cream and milk into the pumpkin and bring to a bare simmer.
5. In a bowl, whisk the eggs. Then, slowly whisk in a bit of the pumpkin. Continue adding a bit more at a time until the egg mixture is warm. Then, slowly whisk it into the rest in the pan.
6. Pour filling into pie shell. Bake about 25 minutes, until filling is puffed dry-looking and lightly cracked around the edges. Cool on rack before serving.

Chocolate gingersnap tart

Chocolate tart

Thanksgiving this year presented a challenge, in that not only did I overextend myself for my parents' holiday, but my boyfriend was going to spend the holiday with his parents instead and was wondering if I could whip something up for him to contribute to the holiday table. It had to be something sort of holiday-ish, fancy enough for a holiday dinner, but it also had to be something that would keep in the fridge for a couple of days, 'cause I was already booked up in the days before Thanksgiving with making pies for my parents' dinner.

And then, I came across this recipe. It's holiday-ish, in that it has a gingersnap crust and ginger is a good fall/winter holiday flavor, and everybody loves deep, rich chocolate. Plus, tarts always look fancy, even if they're simple, and this one's pretty easy to put together. And it kept just fine in the fridge for a few days, too. The only thing I didn't like about this was how the crust came out, 'cause this is another of the umpteen recipes that calls for a food processor, and I don't have one, so I couldn't get the crumbs as small as I'd have liked.

I'd advise you to keep the slices tiny when serving this. The filling is like a truffle, super-rich, so you probably won't want a whole lot of it.

Chocolate Gingersnap Tart
From Smitten Kitchen

8 oz gingersnap cookies (about 32 cookies), pounded (or food-processed) into crumbs
1/4 c butter, melted
Pinch of salt
12 oz bittersweet chocolate, chopped (60% cacao; use chips if you can find them)
1 c heavy cream
2 egg yolks
1 egg
1/4 c sugar
1 tbsp flour
1/8 tsp pepper
Pinch of salt
1/4 tsp cinnamon

1. Pound or process the cookies into crumbs. Add the butter and salt and mix until moistened. Press into the bottom and sides of a tart pan with removable sides. Place pan on a baking sheet.
2. Whisk together the eggs, sugar, flour, pepper, salt and cinnamon in a medium bowl.
3. In another bowl, cook the chocolate and cream together in the microwave until just melted, then whisk together to combine.
4. Slowly whisk the chocolate into the egg mixture. Pour mixture into crust.
5. Bake at 325 degrees for about 30 minutes, until the edges puff and the center is set. Cool on rack 20 minutes, then remove sides of pan and cool completely before cutting.

Tuesday, November 16, 2010

Pumpkin bread

Pumpkin bread

You'd think I would have learned my lesson about pan size from the ill-fated apple bread, and y'know, I did, or I thought I did. After that fiasco, in which I only had 8-by-4 pans and the recipe called for 9-by-5s, I thought, y'know, 9-by-5 is a more common loaf size, so I might as well buy a pair of those, just to have for the next time.

So when I decided to make pumpkin bread, I figured I was all set. I've got the most common size, 9-by-5. And I've got the other, less-common size, 8-by-4. I've got two of each, which is about how many loaves any recipe is likely to make. I was all set, right? Yeah, no. 'Cause this recipe, as if trying to mock me personally, calls for three pans, and they're 7-by-3. 7-by-3??? Do they even make 7-by-3 loaf pans??? I've never seen one. It was hard enough for me even to find the 8-by-4 ones. I've never even heard of 7-by-3.

But I was determined to make pumpkin bread, and this recipe sounded the most promising, so I soldiered on. I ended up with two 8-by-4 loaves, which were a little overdone on the outside, 'cause I had to ensure that the insides were done all the way. And I broke in my new mini-loaf pan with the leftover batter, producing three little loaves that actually came out perfectly (and they're delicious, too!). Next time, maybe I'll just make a couple of batches of the minis.

Pumpkin Bread
Recipe from AllRecipes

3 1/2 c flour
2 tsp baking soda
1 1/2 tsp salt
1 tsp cinnamon
1 tsp nutmeg
1/2 tsp cloves
1/4 tsp ginger
1 (15-ounce) can pumpkin puree
4 eggs
1 c oil
2/3 c water
3 c sugar

1. Whisk together the flour, baking soda, salt, cinnamon, nutmeg, cloves and ginger.
2. In another, larger bowl, beat together the pumpkin, eggs, oil, water and sugar. Beat in the dry ingredients just until combined.
3. Pour batter into greased and floured pans (though I didn't bother with either in my nonstick mini-loaf pan, and they came out fine). Bake at 350 for 50 minutes for three 7-by-3 loaves (if you can actually find those pans), or less time for minis (mine took around 30 minutes) -- they'll be done when a toothpick in the center comes out clean.

Tuesday, November 9, 2010

Biscuit quest

Biscuit

I am on a quest. A quest, for the Holy Grail... of biscuits. And sadly, this is not them, either.

Granted, these aren't bad. If you wanted to slather some salted butter on them, or pour gravy over them, they'd be divine. They're nice and soft and light and have a nice tang of buttermilk.

But sometimes, you want the bad stuff. Sometimes, you know you can make French fries in your oven from real potatoes, but you just want the ones from McDonald's, even though you know how bad they are for you. And sometimes... well, sometimes you want biscuits so good that they don't need gravy, or honey, or butter, or anything at all.

I'm talking about the power duo of horribly-unhealthy, ridiculously-delicous biscuits: KFC and Cracker Barrel. Say what you want about their food or its nutritional value -- those biscuits are heaven. But despite my repeated attempts, I just can't figure out how to make them myself, from scratch. Is it the chemicals and preservatives that makes them so good? I don't know. My quest continues.

In the meantime, I'll share these, 'cause they're still pretty decent biscuits, as long as you're planning to put something on them. They're good. They're just not great.

Biscuits
Adapted from AllRecipes

2 c flour
1 1/2 tsp baking powder
1/2 tsp baking soda
Dash of salt
1 tbsp sugar
1/2 c butter, slightly softened and cut into pieces
3/4 c buttermilk

1. Whisk together the flour, baking powder, baking soda, salt and sugar. Cut in the butter with a pastry blender until the mixture resembles coarse crumbs.
2. Mix in the buttermilk and knead the dough just until it comes together.
3. Pat the dough out onto a floured surface until it's about an inch or so thick, then cut with a 2-inch biscuit cutter (or the rim of a glass, if you don't have a cutter).
4. Place on a cookie sheet and bake at 400 degrees for 10 to 15 minutes, until the tops are barely browned and the bottoms are golden.

Tuesday, October 26, 2010

Pumpkin cupcakes

Pumpkin cupcake with a jack-o'-lantern on top

I just couldn't hold out anymore. Despite the pile of apples I still have, I just can't take another apple recipe, especially when pumpkin season is already upon us and Halloween is just days away. So I caved and stocked up on cans of pumpkin puree (if it's good enough for every chef on the Food Network, it's good enough for me), and here we go, it's pumpkin time.

This recipe was a nice combination of practicing things I know and new things I hadn't tried, 'cause I decided to make these Halloween-y and make my own jack-o'-lantern decorations. I'd never worked with fondant before, and I'd always heard it tastes horrible, so I did a little research online, and what I discovered is that Duff Goldman's brand of fondant is actually supposed to taste pretty decent. I won't buy a product just 'cause it has a famous chef's name on it, but if the product is actually good, I'm all for it. And this stuff's not bad. It tastes like buttercream, really buttery buttercream. I wouldn't want to eat a ton of it, 'cause it's basically chewy frosting, but it's not bad.

Fondant pumpkin Finished jack-o'-lantern

I was really impressed with how these came out, too, 'cause I had a picture in my head of how they'd look, but I've never worked with fondant before, so I was prepared for them to look stupid. But they don't. They look adorable! And they're just like I pictured in my head. I put together some fondant, some gel food color and an edible-ink pen, and I created these cute little buggers. Even my boyfriend remarked, "aw, those are kinda cute." :) They're not all identical, but I wasn't trying for that -- I figured that you almost never see two pumpkins alike in nature, so mine wouldn't be, either.

And oh yeah, the cupcakes are pretty tasty, too. They also made the house smell so good that I had all I could do not to scarf them all down straight out of the oven, cooling and frosting be damned.

Dry ingredients I will not eat them now, I will not eat them now...

Pumpkin Cupcakes
Adapted from Smitten Kitchen

1 stick, room temperature
1 c dark brown sugar
1/3 c sugar
2 c flour
2 tsp baking powder
1 tsp baking soda
1 tsp cinnamon
1 tsp ginger
1/2 tsp nutmeg
1/8 tsp cloves
1/2 tsp salt
1/4 tsp pepper
2 eggs
1/2 c buttermilk mixed with 1 tsp vanilla
1 1/4 c canned pumpkin (NOT pie mix, just pumpkin)

2 8-ounce packages cream cheese, softened
1 stick butter, softened
2 c confectioners’ sugar
1/4 c maple syrup (the real stuff, not pancake syrup)

1. Preheat the oven to 350 degrees and line muffin cups with cupcake papers.
2. In a large bowl, beat together the butter and sugars on medium until fluffy.
3. In another bowl, whisk together the flour, baking powder, baking soda, cinnamon, ginger, nutmeg, cloves, salt and pepper.
4. To the first bowl, beat in the eggs one at a time.
5. Beat in the dry ingredients and the buttermilk mixture, alternating between them, starting and ending with the dry ingredients.
6. Beat in the pumpkin until incorporated.
7. Fill the cupcake cups about 3/4 full. Bake about 20-25 minutes, until a toothpick in the center comes out clean.
8. Let cool a few minutes, then de-pan onto a rack to cool completely.
9. Beat together all of the frosting ingredients on medium until fluffy. Pipe or spread onto cupcakes.

Tuesday, October 19, 2010

Apple bread

Apple bread

Today's lesson: Sometimes, size does matter.

See, I had this idea that if one loaf of apple bread was a good idea, two would be even better, so I should double the recipe. And that would have been a great idea, except for one thing: I didn't notice until I was actually putting the batter in the pans that this recipe calls for a 9-by-5 loaf pan, and I have 8-by-4 loaf pans. I thought "well, heck, what's the worst that can happen -- maybe they'll be a little tall, puff up a bit over the top of the pan, no big deal," and I went ahead and filled those pans full.

What actually happened was that when I put them in the oven, the batter started spilling over the sides of the pans as if it was fleeing for its life, some of it hitting the bottom of the oven in a big, batter-y pile that started to smoke up the kitchen a bit. Um, oops. (Now, if I had been thinking, I would've at least put a pan or some foil or something on the rack below them, just in case this happened. But I digress.)

I had planned on taking one of these loaves to work, but after seeing how misshapen they looked, I couldn't bring myself to put one out for public consumption (and silent criticism). Guess I'll just have to eat them both. Good thing they're still really, really tasty. I'd make this again, but I'd definitely scale the recipe back for my pans, maybe a one-and-a-half batch for the two pans. I might try swirling the topping into the batter, too, 'cause when I de-panned them, a lot of the topping fell off.

Apple Bread
From Tasty Kitchen
Yield as written: One 9-by-5 loaf

1/2 c butter, softened
1 c sugar
1/4 c milk
2 eggs
1 tsp vanilla
2 c shredded apples
2 c flour
2 tsp baking powder
1/2 tsp salt
1 tsp cinnamon

1/4 c brown sugar
3 tbsp flour
1/4 tsp cinnamon
2 tbsp butter, cold, cut into pieces
1/2 c walnuts, chopped

1. Preheat the oven to 350 degrees and spray the loaf pan with nonstick spray.
2. In one bowl, cream together the butter and sugar. Beat in the milk, eggs, vanilla and apples. (Mine looked like a gloppy, nasty disaster right about now, but fear not.)
3. In another bowl, whisk together the flour, baking powder, salt and cinnamon.
4. Beat the dry ingredients into the wet ingredients. Pour batter into pan.
5. In a bowl, crumble together the brown sugar, flour, cinnamon, butter and nuts. Sprinkle over the batter.
6. Bake at 350 degrees for about 60 minutes, until a toothpick comes out clean. Let stand 10 minutes, then de-pan and cool on a rack.

Tuesday, October 12, 2010

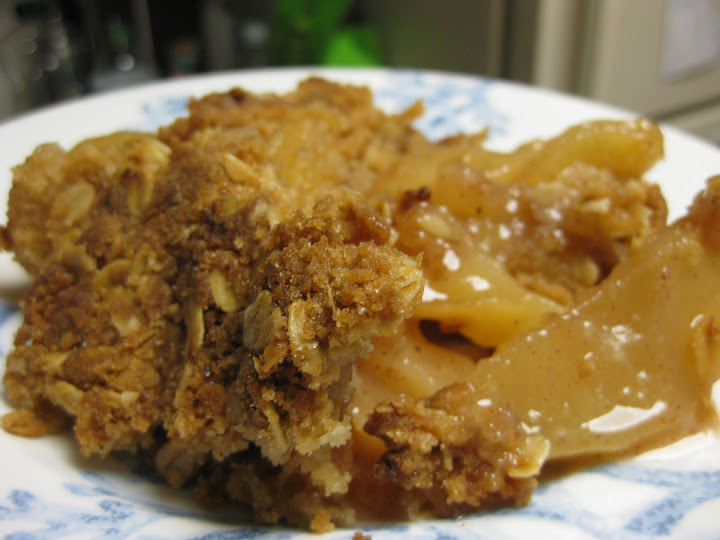
Apple crisp

Apple crisp, mmmm

It's been way too long, hasn't it? Sorry about that, mythical reader. But I've been buried under a pile of apples, and a lot of what I've done with them hasn't really qualified as baking. One week, I made apple butter, which was just a slow-cooker thing. Another week, I made turnovers, but if refrigerated puff pastry is good enough for Alton Brown, it's good enough for me -- still, it didn't really seem to qualify as "home-baked," not enough to blog about.

So here we are, weeks later, and I've finally gotten around to what might be one of the most universally-loved apple dishes out there: Apple crisp. Yum! Apple crisp has to be right up there with apple pie, if not a very close second, as far as apple dishes go. And it's so much easier, 'cause you don't have to make a pastry (though the pastry I posted for apple pie is surprisingly easy) -- you just have to crumble some stuff together and mix some stuff together, slap it in a pan and bake it until you can't resist the smell coming from your oven any longer. Heck, you don't even need utensils to make it, other than peeling and cutting the apples. Once that was done, I just used my hands.

Apple Crisp
Adapted from Tasty Kitchen

8 apples, peeled, cored and cut up into pieces
1 tbsp lemon juice
1/2 c sugar
1/4 c flour
1 tsp cinnamon
1/2 tsp nutmeg

1 1/2 c flour
3/4 c sugar
3/4 c brown sugar
1 tsp salt
1 c rolled oats
2 sticks butter, cut up

1. In the biggest bowl you've got, mix the cut-up apples with the lemon juice, sugar, flour, cinnamon and nutmeg. Spread in the bottom of a 9-by-13 baking dish.
2. Crumble together the rest of the ingredients in a large bowl with your fingers. Sprinkle evenly over the apples.
3. Bake at 350 degrees for about an hour, until the top is browned and the filling is bubbly.

Monday, September 20, 2010

Peanut butter bars

Mmmmm

I have two things to say about this recipe:

1. If you have any sort of reason to bake for other people, make these.

2. If you like them, make an extra batch, 'cause you won't be bringing any home with you afterward.

They're not only really good, but people freakin' LOVE them -- I've yet to have leftovers, ever, no matter who I've fed them to, even though the recipe does use a rather large pan. As long as nobody's allergic to peanuts, they're a surefire winner, like a bar cookie and a peanut butter cup had a baby, or like "the perfect PMS food," I've been told.

Peanut Butter Bars
Recipe from Smitten Kitchen

2 sticks butter, softened
1 3/4 c sugar
1 c peanut butter (creamy)
1/2 tsp salt (if using unsalted butter, which I always do)
2 eggs plus 1 egg yolk
2 tsp vanilla
2 c flour
1 1/2 c chocolate chips

1 1/2 c chocolate chips
1/2 c heavy cream
1 tbsp butter

1. Cream together the butter and sugar. Beat in the peanut butter, salt, eggs and vanilla. Beat in the flour.
2. Fold in the chocolate chips.
3. Spread in a buttered 9-by-13 baking pan. Bake at 350 degrees for about 40-45 minutes, until golden and puffed and a toothpick comes out with a few crumbs on it.
4. Cool completely.
5. Mix chocolate chips, cream and butter in a small bowl and microwave for 30 seconds, then stir. Repeat until you have a smooth, melted mixture.
6. Spread this ganache over your bars and let it cool and set before cutting.

Monday, September 13, 2010

Apple pie

Mmm, pie

Rarely do I find myself recapturing the magic of baking, that feeling of "oh my god, I made this?" It's pretty exciting, eating something that tastes amazing, bought-from-a-store amazing, even straight-from-the-best-bakery-in-town amazing, and knowing that you actually created that, all by yourself, from nothing. And it's even more amazing when what you're eating is the single most iconic dish of your childhood, the dish you begged your mom for but only got as a rare treat, the food so perfect that most store-bought versions paled in comparison.

The short version: Holy crap, you have got to make this! I'm ashamed to say it, but it's better than my mom's. It's the best apple pie I've ever tasted. My boyfriend (and apple-peeling assistant) raved about it, too. There's just one catch to this recipe -- you'll need to make a trip to the liquor store. Yes, another recipe with alcohol in it. But you don't taste it. It's just there for food-science reasons, to hold the dough together without creating gluten. It all bakes off in the oven, and what you're left with is flaky, golden bliss. :)

Dough ready for chilling Apples all mixed up
Ready for the oven Fresh-baked pie

Apple Pie
Adapted from "Cook's Illustrated"

2 1/2 c flour, plus more for rolling out dough
1 tsp salt
2 tbsp sugar
12 tbsp butter, chilled and cut into pieces
1/2 c shortening, chilled and cut into pieces (I use butter-flavored Crisco)
1/4 c cold water
1/4 c vodka, chilled

About 8 apples, peeled, cored and cut up into slices
About 3/4 c sugar (use less if you're using sweeter apples, more if they're tart ones)
2 tbsp of so of flour (again, if you're using really juicy apples, use more...)
1 tbsp or so lemon juice
1/4 tsp salt
1/4 tsp nutmeg
1/4 tsp cinnamon
1/8 tsp allspice

1. Place flour, salt, sugar, butter and shortening together in a large bowl and cut together with a pastry blender or a couple of forks until you don't see any white flour anymore (it should all be yellow, coated with fat).
2. Pour the water and vodka over the top and fold together gently with a rubber spatula (or your hands) until you have a sticky dough.
3. Divide the dough into two balls. Place each on a piece of plastic wrap, flatten into a 4-inch disc and wrap securely. Chill at least 45 minutes in the fridge (or cheat like I did and put it in the freezer for a little bit -- you just want to make sure it's chilled).
4. In an extra-large bowl (the biggest one you have in your kitchen), mix the apples, sugar, flour, salt, lemon juice (to taste -- I just used a few sprinkles out of one of those little lemon-shaped bottles) and spices (again, to taste -- I went with my mom's method, shake some out until it looks good, mix it up, add more if needed).
5. Roll out one piece of dough on a piece of floured waxed paper until it's big enough for the bottom of a glass pie pan (hold the pan upside-down above the dough to check if it's big enough). Line the pan with the dough, leaving the ragged edges draped over the edge of the pan. (Some people swear by rolling the dough up onto your rolling pin, then unrolling it into the pan. Me, I place the pan upside-down on the dough, put my hand under the waxed paper, flip the whole thing and peel the paper off. Whatever works for you, go with it.)
6. Fill the pie bottom with the apples, heaping them up in the middle. (They will shrink, so don't be afraid to go big with your pile.)
7. Roll out the second piece of dough, making sure to roll it a bit bigger so it will cover the heap of apples and drape over the edges a bit. Use that dough to cover the pie (any way you can manage -- I picked the whole paper up and plopped it on top of my pie, which kicked up a lot of flour all over my work space but got the job done).
8. Crimp the edges of the pie together (you can use a fork, if you want -- I use two fingers pushed together). Trim off the excess by running a knife around the pie underneath the rim. Use the knife to poke some holes in the top of the pie for steam to escape.
9. Place a big piece of foil on the bottom rack of your oven to catch drips (trust me, there will be some). Preheat the oven to 375 degrees.
10. Bake the pie for 25 minutes to an hour or so, until crust is golden and filling is bubbly (it will start sneaking out the vent holes).

Yes, that's a wide range of baking times, because you really can't just leave it and come back to a pie X minutes later. You have to watch it. Crust getting too brown around the edges too soon? Slap some foil on those edges. Top too brown already? Ditto, tent it with a piece of foil. Like your apples crunchy? Pull the pie rather early. Like them soft? Leave it in there and test it with a toothpick until you're happy with the filling's texture. Most people will want to produce a pie that reminds them of their mom's, and most moms make their pie differently, so use your judgment -- keep an eye on it and cook it until you're happy with the result.